Fisherman’s Soap and Orange Gifts
I’m participating in the reddit secret santa initiative and thought some homemade fisherman’s soap would be a great gift!
You can find the recipe for this soap in the shared soap recipes section.
I’m participating in the reddit secret santa initiative and thought some homemade fisherman’s soap would be a great gift!
You can find the recipe for this soap in the shared soap recipes section.
With winter coming, I thought I’d make a extra moisturizing soap. This soap takes a simple base and adds moisturizers like Lanolin, Shea Butter and Vit. E.
This video is an updated version of a previous video that had audio problems. This is a quick video to show the process I went through to create a very nice soap with lavender flowers embedded in it. The soap is made with milk (heavy whipping cream) and then palm oil, coconut oil, soybean oil and cocoa butter. I added Vitamin E, Peach coloring and Lotus Blossom fragrance after the soap reached trace. Enjoy!
This video talks about some tricks you can use to preserve the oils that you use to make soap. You can use Vit. E, BHT, Rosemary oil or just put the oil in a fridge.
Fluid (goat’s milk) needed: |
|
||||||||||||||||||||||||||||||||||||||||||||||||||||||||||||||

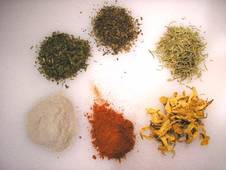 When making natural handmade soap, you can make all types of soaps to fit your desired niche. One of the possibilities is that of including an exfoliant in your soap to help lift away any dead skin or caked on dirt that needs a little extra scrubbing to get clean. One such exfoliant is Sodium Bentonite Powder which can be found at most health-food stores. This exfoliant will not only remove dirt and dead skin but also help to lift away the toxins in your skin. If you don’t have access to this clay, you can also start using products you probably have sitting around in your kitchen right now. You can use poppy seeds, blueberry seeds, ground almond meal, ground walnut husk meal or even ground oatmeal. Below you will find a more complete list which you can experiment with.
Once you have chosen what exfoliant to use, you will need to add it to your soap recipe. The perfect spot to add exfoliants is right after your soap has reached trace and you are adding your fragrance, superfat or color to the soap batch. With most exfoliants, because of their fine granular nature, you will want to mix them beforehand with a carrier oil so you don’t have to worry about lumps in your soap. There is nothing worse than finding huge pockets of exfoliant in your soap when you are using the soap. Once you have added the exfoliant to the soap mixture, you just need to mix it in thoroughly. Some exfoliants may thicken your soap batch while you are stirring it. Don’t panic! Your soap will be fine. Just continue to mix the soap but get it into the mold quickly before it thickens beyond your ability to fill the mold. At this point, you would treat this soap as you would any other soap and allow it to saponify for a few days, cut it and then let it dry in bars.
Fluid (kombucha tea) needed:
added patchouli and cedar essential oils |
|
|||||||||||||||||||||||||||||||||||||||||||||||||||||
 If you are a soap maker, you have at some point come across the controversy of soaps verses detergents. Many see soap as a natural product whereas detergents are synthetic creations coming from a lab. In reality, both soaps and detergents are synthetic products that take naturally occurring chemicals and synthesize them into a new product. The big difference for soapers is that soap is easy to make at home while detergent is far too complex. Soap and detergent, while both good at cleaning, have different properties when placed in different environments. The biggest difference is that when soap is placed in hard water or an acidic solution, it forms a scum that is difficult to get out of clothes (if using for washing). Detergent does not suffer from this problem. The other major difference is that detergent works as efficiently in cold water as in warm. It is really these two reasons that detergent has taken over the laundry soap business.
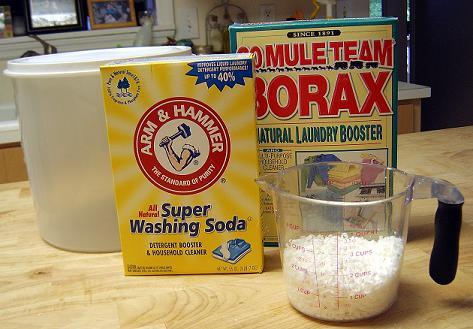
The basic ingredients you will need to make your own laundry soap are:
Soap: You really can use any bar of soap you like for this. I tend to like to use a simple soap that is made of 1/3 olive oil, 1/3 palm oil and 1/3 coconut oil that has been made with very little superfat discount. You will need to use about 3-4 oz of soap for this recipe.
Washing Soda: The biggest supplier of washing soda is Arm and Hammer. Because of this you might get confused between this product and their baking soda product. They are not the same! Washing soda is sodium carbonate whereas baking soda is sodium bicarbonate. This powder will give your soap a boost in removing dirt and odors.
Borax: This ingredient is a naturally occurring mineral that helps remove various forms of oils and dirts as well as deodorizing the laundry. Borax is just another name for sodium borate and can be found in most grocery stores in the laundry aisle.
The process of putting these ingredients together is not very time consuming and is well worth the cost savings per load of laundry (it costs about a penny a load). Grate the soap and put it in a sauce pan. Add 6 cups water and heat it until the soap melts. Add the washing soda and the borax and stir until it is dissolved. Remove from heat. Pour 4 cups hot water into the bucket. Now add your soap mixture and stir. Now add 1 gallon plus 6 cups of water and stir. Let the soap sit for about 24 hours and it will gel. You use half a cup per load. You now have homemade laundry soap!
When you use this soap, you will notice it does not act like laundry detergent when cleaning your clothes. The homemade soap will be a little thiner of a gel than detergent and you will not notice as many soap bubbles when washing. This is perfectly natural and in fact, the bubbles do not indicate any type of cleaning properties. Now enjoy your freedom from the laundry detergent companies!
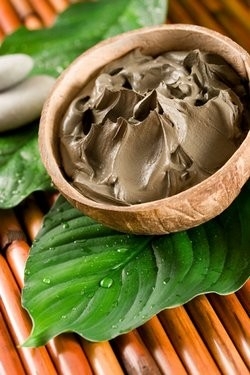
 If you look on various food products like candy bars, yogurt, protein powders, baby milk powders, rice milk powders, toothpaste and animal and pet foods; you will notice a peculiar ingredient: Sodium Bentonite. This substance expands when wet, absorbing as much as several times its dry mass in water. Despite its fancy name, sodium bentonite is really just clay. Because of it’s absorbing properties, bentonite clay has been used the world around for medicinal purposes. The first known use of clay for medicine was in ancient Mesopotamia where physicians used the material as an anti-inflammatory agent and antiseptic. A recent study has found that Bentonite clay is actually anti-bacterial even able to take on the super bacteria MRSA. Further use of clay is by taking it internally to sweep away harmful toxins and heavy metals that may be residing in the body. In the stomach, the negative electrical charges of tiny clay particles attract positively charged toxins from stomach fluids. This clumping prevents very small particles, such as toxic molecules, from passing through the walls of the intestines and entering the bloodstream. The toxins and the clay are then expelled from the body in the normal bowel movements.
The actual use of the clay is fairly simple. One way you can use it is in a face-mask. The anti-bacterial properties and the toxin absorbing properties of the clay will work effectively against various types of acne. The clay will also give you skin a radiant glow. To make such a mask, you just need to get a quarter of a cup of bentonite powder and mix in enough water to make a substance that is similar to room-temperature butter. After applying the clay to your face and allowing it to dry, wash off the clay and apply a gentle moisturizer to replace any rancid oil that the clay has removed from your skin.
To take the clay internally, you will want to start out with no more than a teaspoon of clay in an entire glass of water. Your body will need to adjust to the clay just as it does to adding fiber to your diet. The key is to not intake too much clay as to have it start absorbing water from your body making you dehydrated. The more clay you drink, the more you may notice your bowel movements to turn grey. This is normal but it does mean you should not increase the amount of clay you are intaking.
Overall, bentonite powder is a nice natural way to gently flush your body of harmful toxins and heavy metals as well as making your skin look amazing.

 One of the major ingredients in soap making is Caustic Soda or Lye. Most soap-makers use industrial grade Sodium Hydroxide as their Caustic Soda but really any strong base would work in the soap making process. One such caustic that can be produced at home is Caustic Potash, or Potassium Hydroxide. While potassium hydroxide is often used to make softer bars of soap or even liquid soap, the type of wood ashes that are used can be selected to impart extra properties to the soap that would not be available to industrially purified chemicals. What every lye you choose to use the metaphysical farms lye calculator lets you choose either sodium hydroxide or potassium hydroxide when making soap. If you want to know how to make your own lye you will need the following equipment:
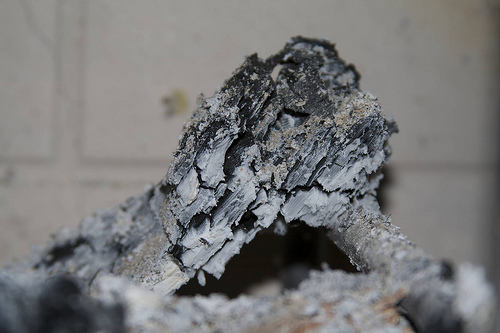
The first ingredient you will need is soft water. You can obtain this by buying soft distilled water (no mineral water), getting water from a dehumidifier or the traditional way is to collect rain water in a barrel. This ingredient by far is the most important to get right to ensure a good leaching of lye. Next you will need a container with a spout at the bottom. Traditionally this has been a wooden barrel with a hole drilled on the bottom big enough for a cork but if you don’t have access to wooden barrels, you can easily use a cooler with a spout at the bottom. You will also need rocks and straw or cheese cloth to filter the ash. The final ingredient you need is wood ashes. The best ashes to use are hardwoods and you want to avoid evergreens (like pine and fir). Other things you can use are ashes of herbs and flowers to add a special touch to your lye.
Quick Reference
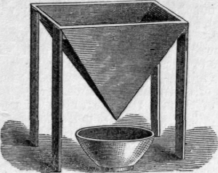 Step 1: Find a place that the spouted container will be undisturbed. Lye is caustic. Take the necessary precautions. I suggest doing this outside or in your garage. Put some bricks down and place the container on top of them. The reason for this is to raise the container up so that you can easily drain off the lye into a bucket when it is ready. Give yourself room to work.
Step 2: Cover the bottom of the container with some palm-sized clean rocks (e.g. river rock). Cover the rocks with approximately 6″ of straw (this can be hay or grass) or a few layers of cheese cloth. This will filter the ashes and help your lye drain cleanly.
Step 3: Burn the wood you have collected and save the ashes. An ideal place is in a fireplace or some other contained location.
Step 4: Scoop the ashes out and put them in the prepped spouted container. Be sure the ash is completely cool or you might have a fire start in your container.
Step 5: Put a pan under the hole and open the spout. Pour the soft water in until you see it start to drain into the pan, then close the spout. The water level should be about 6″ from the top. After a day, the first ash should settle and you can add more ash.
Step 6: Let it sit for at least 3 days. You can add ash all week and drain it regularly on a specific day of the week.
Step 7: Check to see if your lye is ready. If you don’t have fancy litmus papers, you can use a potato to test the strength of the lye water. Put a potato in the top of the container and if it floats 1/4 of an inch above the water then your lye water is ready
Step 8: Put it under the tap, gently pull the cork, and fill your containers. Leave enough head room so that they will be safe and easy to pour. Make sure that you have tight, fitting lids.
Finally you will want to store your lye in a cool dark place until use. (The sooner the better)