Honey Heaven
Fluid (water and honey) needed:
vanilla and rose fragrance |
|
|||||||||||||||||||||||||||||||||||||||||||||||||||||||||||
Fluid (water and honey) needed:
vanilla and rose fragrance |
|
|||||||||||||||||||||||||||||||||||||||||||||||||||||||||||

 The process for making soap via the Hot Process method is quite similar to the Cold Process method. In fact many of the same recipes can be use interchangeably between the two methods. In the extended entry below, I have listed the materials needed to start the soap making process. The basic premis behind soap making is to take an acid (fat) and mix it with a base (lye) to form a salt like product that is able to change the surface tension when mixed with water making it ideal for whisking away particles of dirt and oil.
Safety Equipment
Safety First! You will need a pair of safety goggles and a pair of safety gloves. Lye is extremely caustic. You’ll notice just how caustic if you leave it open on a humid day. You might want to also consider an apron specifically for making soap. Unless you’re like me and you think holes in your jeans are cool.
Measuring Equipment
A Scale is a must. All quality soap making formulas depend on the weight of the ingredients and not the volume. I use a $9 postal scale. A measuring cup for the liquid you are going to use. You could measure the water by weight as water has a 1:1 ratio of weight to volume (English and metric). A good set of measuring spoons is always good to have handy for fragrances and/or colors. You will also need a thermometer to check the temperature of the oils and lye solution before mixing them together.
Containers
You’ll need 2 containers that are heat safe and lye safe. I use two heat safe Pyrex glass jars. Glass is great for lye if and only if it is heat safe. When you mix the lye with water it will heat the water up very quickly to 212°+F/100°+C and will cause glass to crack and you will have a strong lye solution all over. Other containers you could consider would include cast iron, steel, ceramic, etc. Never use aluminum! Lye will eat right through it. You’ll also want to have 2 cups (plastic is fine here) to use to hold your oils and lye as you measure them on the scale. Make sure you label these for soap making only. You don’t want to cook with any of these no matter how much you clean them.
Mixing Equipment
Most places suggest a wooden spoon. Really any spoon that is lye safe and heat safe will work. The problem with wooden spoons is after a while they will start to dissolve because of the lye. I would also suggest you invest in a stick blender. This will make the process of mixing your soap 100 times easier.
Ingredients
There are many things you can add to your soap (I’ve even seen formulas that call for ketsup). The basic things you will need are water, lye, and oil.
Oil (lipid): The type of oil you choose will make major differences in the type of soap you get. Each oil has its own properties that it adds to the soap. You can check out the sap table on this site for a list of oils and the properties they have. The table shows the iodine value (the lower the number the harder the bar), type of lather, conditioning, and a general hard/soft bar designation.
Lye: There are two types of “lye” that can be used for soap making; sodium hydroxide (NaOH) or potassium hydroxide (KOH). Sodium hydroxide is often used in making ‘bar’ soaps and potassium hydroxide is often used to make liquid soaps. Both are not readily available anymore. The first place to check is a local hardware store or backing supply store (Lye was/is often used in making soft pretzels a golden brown outside but leaving the inside soft). If you cannot find it locally, your only other option is to call scientific supply stores or search the Internet. You will notice, though, that if you buy more than 2lbs of lye you will be slapped with a $50 shipping charge because of the caustic nature of lye.
Water: A clean bar of soap starts with clean water. I recommend starting with distilled water. You can steep teas in the water to add a variety of properties to your finished soap. You can also replace the water with a variety of different milks. If you are using anything besides distilled water, I would suggest making a small batch of soap to see how it turns out.
Soap Mold
After you have made your soap you need somewhere to put it as it cures. A plastic lined desk drawer works just as well as any fancy mould you can buy. This is another place in soap making where creativity is the limit.
Quick Reference
Making the Soap
Now that you have all of your equipment you are ready to make some soap! Setup your work area so that you won’t be disturbed. Open a few windows if you are inside. Line your moulds with wax-paper or plastic and set them aside. I like to set the oils and oil jar I will be using on my left, scale in the middle, lye and lye jar on my right. I also put a few sheets of wax paper under the scale in case of small spills. Measure your oils and keep a record of the weight of each oil. After you have combined all of your oils in your oil container you will need to figure out the amount of lye and liquid you need.
The liquid is easy. Just multiply the total weight of the oil by 28%-40% (.28 – .40). The more liquid you use the longer it will take for the bar to harden. I usually use 30%-33% (.30 – .33). Next you need to figure out the amount of lye. You can do this by hand using the sap table. Take the amount of each oil and multiply it by the SAP # then add the products together to get the total amount of lye. I also have a lye and liquid calculator you can use if you don’t want to do the calculations by hand. The calculator will also give you the amount of lye to use when superfatting your soap (superfatting or leaving some oil in the soap is recommended @ 4-5% to allow for a moisturizing soap that is not harsh on the skin). Put on your safety goggles and gloves (if they are not already on) and measure out the liquid you need. Put it into the empty lye container. Open the lye and measure the amount on the scale that you calculated. Close the lye. Start mixing the liquid and slowly pour the lye into the liquid. Keep stirring until the lye is completely dissolved. The mixture will heat up (and may start to boil). It will also start to release fumes. Lid the container and set it aside to cool.
As the lye solution is cooling you will want to heat up your oils. You want to oil and the lye to be very near the same temperature. The temperature you are shooting for is 100%°-120°F/38°-49°C. A double boiler works great for heating the oils or if the container will fit (and is safe) the microwave at 15-30 second bursts.
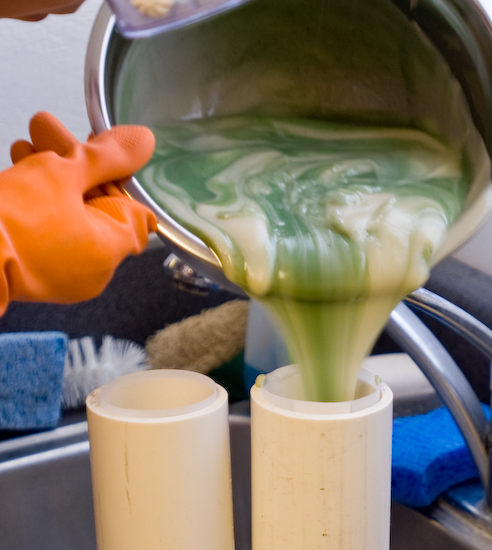
Once your lye solution and oils are at or near the same temperature begin stirring the oils then pour the lye solution into the oils while you are stirring. What will happen now is the lye will begin to break the chemical bonds in the oils and create essentially a salt. This is called saponification. While the oils is saponifying you are looking for it to trace (thicken). If you are stirring by hand it can take anywhere from 15-45min to trace depending on the oils you used. You can speed this process up by using a stick blender. If you use a stick blender be cautious of bubbles in your trace. You’ll want to mix until you reach a custard type consistency.
The Hot Process and Cooking the Soap
Once the soap reaches a full trace, it’s time to cook the mixture and force the gel. You will want to put the soap into a crock pot (you could even start the oils out in the pot to heat them up) Put the lid on the crock pot and leave it to cook on low for awhile. The soap will heat up and start to bubble around the edges of the crock pot. Keep an eye on the soap and stir it down gently only if it starts to bubble over. The mix will begin to take on a clear vaseline like look. Once the whole mix has this look, you can test it to see if it is done. Take a small sample of the soap and rub it between your fingers. It should have a waxy feel. Test the soap by touching it to your tongue. Keep cooking….if it ‘zaps’ like a nine volt battery, it’s not done.
Additives
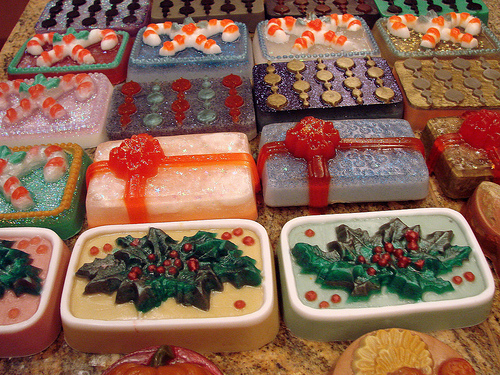
At this point you can add fragrances, extra oils, colors, exfoliants, etc. Once your additives, if any, have been incorporated pour your mixture into the mould(s) you have. Hot process soap is a lot like rebatching when it comes to molding. It doesn’t pour. It is a thick goopy mass (like mashed potatoes) that must be scooped into the mold quickly. Make sure to tap the mold on the counter to get out any air pockets.
Once your soap has reached room temperature remove the mixture from the mould. If you are using a large mould that requires cutting the bars, now is the time to do it. After cutting the bars allow the soap to further cure and harden in a well ventilated area. You may even need to turn them a few times to be sure all sides are exposed to the air. It can take up to six weeks for a bar to be completely finished saponifying. The longer the cure time, the milder the soap will be.
See, that was easy and fun!

 For some soap makers, the melt and pour method is a simple alternative to the cold and hot process of actual soap making. The different in the melt and pour method is that no saponification actually occurs in the process. This limits the ability of the soaper to control the quality of the soap because the oils that go into the soap are not chosen. Some soap crafters choose to use this method because it removes the need to use caustic chemicals like lye during the process of making soap. This process has already been handled before the soap base has been purchased. The process of melt and pour soap crafting is actually fairly simple. Once you have obtained a melt and pour soap base, you simple place the base into a double boiler and heat up the product. At this point additives such as fragrance, essential oils, colorants, exfoliants or moisturizing agents can be put into the mixture. While the mixture is still hot, you pour it into individual molds or trays just as you would in an actual soap making process. Once the mixture is cooled, it can be sliced and used.
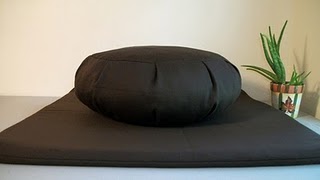
 Meditation is all about finding a space where you can quiet your mind and focus on the present moment. The medical benefits speak for themselves but finding that space can be quiet difficult. Some use binaural audio to help them focus, others find a quiet spot. Others use specially designed seating to help improve the quiet space. One such method is the use of a zafu cushion.
Although ‘zafu’ is often translated as ‘sewn seat’ in American English, the meaning of the Japanese ‘kanji’ is different. ‘za’ means ‘seat’ and ‘fu’ means a seat stuffed with Typha (the fluffy, soft, downy fibres of the disintegrating Typha heads). The Japanese zafu originates in China, where these meditation seats were originally filled with Typha. Today, that is no longer the case in Japan or China. An alternate translation of zafu is ‘cushion for sitting’ or ‘sitting cushion’, where za means ‘sitting’ or ‘sit’ and fu means ‘cushion’. The words zabuton, zafuton and futon are closely linked. The word ‘zazen’ meaning ‘seated meditation’ or ‘sitting meditation’ is also closely linked. In western terms, colloquially speaking, ‘zafu’ refers to a meditation cushion, and ‘zabuton’ refers to the cushioned mat on which a zafu is placed.
Fluid (mint tea) needed: |
|
|||||||||||||||||||||||||||||||||||||||||||||||||||||||||||

Someone suggested in a recent post about meditation that I look into the effects of Binaural Beats. I had researched the subject several years ago and had good results but the technology for generating the audio was still in its proprietary phase and so the (free) tools that I was using required C compilers and building your own waveforms in text files. Today, there are binaural sound production application all over the mobile market as well as for home usage.
 For those unfamiliar with binaural audio (or binaural beats), the basic premise is that playing two different frequencies, one in the left ear and the other in the right, results in a perceived third frequency. Scientific research has shown that the aural effects are measurable and actually do create these audio frequency hallucinations as well as physical responses to the hallucinated sound as if the listener was actually “hearing” the sound. Further research has shown that brainwave patterns will begin to move closer to the frequency of continual sound. This process is called entrainment and it is this process that has lead to the study and use of binaural beats to change brainwave patterns to reach a desired mental state. The table below lists observed brainwave frequencies and what they are associated with when observing them:
| Frequency range | Name | Usually associated with: |
|---|---|---|
| > 40 Hz | Gamma waves | Higher mental activity, including perception, problem solving, fear, and consciousness |
| 13-39 Hz | Beta waves | Active, busy or anxious thinking and active concentration, arousal, cognition, and or paranoia |
| 7-13 Hz | Alpha waves | Relaxation (while awake), pre-sleep and pre-wake drowsiness, REM sleep, Dreams |
| 4-7 Hz | Theta waves | deep meditation/relaxation, NREM sleep |
| < 4 Hz | Delta waves | Deep dreamless sleep, loss of body awareness |
Binaural beat stimulation has been used fairly extensively to induce a variety of states of consciousness, and there has been some work done in regards to the effects of these stimuli on relaxation, focus, attention, and states of consciousness. Studies have shown that with repeated training to distinguish close frequency sounds that a plastic reorganization of the brain occurs for the trained frequencies. So, in theory, those that have trouble quieting the mind or sitting still long enough to focus for meditation could use this method to train the mind to be able to enter into these brainwave states.

A kidney cleanse is a great way to avoid kidney stones, but how do they form? If you are dehydrated or have consumed lots of toxic substances, the urine that passes through the kidney can crystallize, forming mineral deposits or kidney stones. Drinking lots of sugary sodas adds to the stress of your system. If the stones become too big they can block urine flow, causing extreme pain in your lower back. A kidney cleanse helps these stones to dissolve, easing your pain, and can also prevent them from forming in the first place.
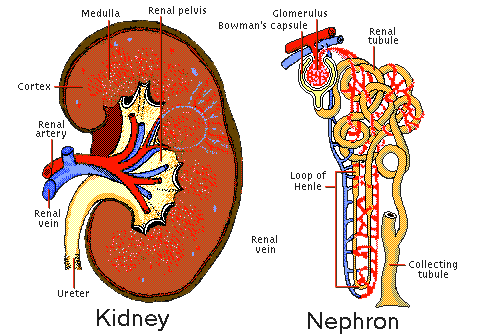 The duties of the kidneys are best described by calling them the filters of the blood. Your blood flows constantly through your kidneys to be purified or filtered. You might be surprised to learn that more than 500 grains of waste matter, acids and poisons have to be moved from the blood through the kidneys every 24 hours. You can easily see, therefore, that on this filtering and eliminating depends your health, to a very great extent. Let the kidneys fail to function properly and nature will call your attention to it right away. When your kidneys fail to function correctly you will feel depressed and tired, restless at night, and pains in the back will show up. There might be scanty urine or a desire to urinate frequently. Your head will ache and many other aches and pains will be making their appearance. You really cannot be surprised that you do not feel well. Just figure your kidneys would do only half the work and eliminate only 250 grains of waste, what will become of the other 250 grains? They will be carried back into your blood and poison your system. Watch, therefore, your kidneys and deal with even minor irregularity promptly.To avoid trouble be careful with your diet. Americans consume daily 80 grams of meat or nearly 3 ounces more of proteinthus attempting to dispose of about 35 grams more than we have capacity for. This overload gradually smashes the kidneys and throws them out of commission.
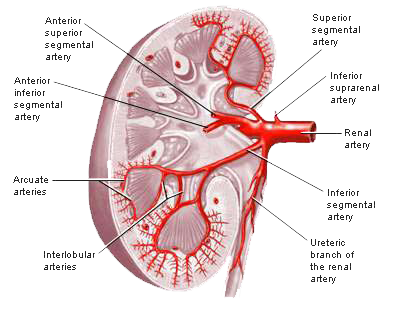 The kidney cleanse is a 3-day fast during which you must drink large quantities of distilled water and apple juice. You can drink up to a gallon of each, separately or mixed together. If you haven’t tried a fast before, don’t worry this cleanse is perfectly healthy. You may be a little hungry, but the apple juice will give you energy and help you feel more full. You can start checking for kidney stones immediately after your first drink of apple juice. Use a simple tea strainer to look for them – they might be very small so look carefully. Not everyone passes kidney stones on this cleanse, but even if you don’t its very healthy and will prevent any future problems.
Try the following herbs before or after your kidney cleanse.
Uva Ursi (Bearberry)
When taken orally, Uva Ursi transforms in the stomach into a compound with antimicrobial and disinfectant properties. It then passes down through the urinary system and so can also aid with urinary infections.
Parsley
Parsley detoxifies the kidney by flushing toxins out, and is beneficial in the treatment and prevention of kidney stones. Parsley contains a compound named Apoil, which has now been isolated and used in medication to treat kidney ailments and kidney stones. To make a Parsley tea, place 2 cups of water and 2 tablespoons of chopped parsley into a pot with the lid on. Heat the water to almost boiling, then turn off the heat. Let it sit for fifteen minutes, then strain the parsley out and enjoy the tea.
Nettles
Nettles are effective diuretics and anti-bacterials that can help to treat and prevent kidney stones. They are available as a tea or in capsules.
Here are two great kidney cleanse recipes. Just throw it all together in the juicer, then drink! You can also use a blender if you want it to be more like a smoothie.
First Recipe:
Second Recipe
Kidney Cleansing Tea
A variety of teas are available that can help with a Kidney Cleanse. Watermelon seed tea and Celery seed tea are both powerful diuretics that increase your water intake and flush water more quickly through the kidneys.
Fluid (water) needed:
blue coloring
|
|
||||||||||||||||||||||||||||||||||||||||||||||||||||||||
 Walking down the bath salts aisle (yes an entire aisle), you will notice an array of various concoctions to add to your bath to make it more soothing or better for your skin. The prices of these additives can be beyond belief, if you know of what they are actually made. Bath Salts are by far one of the easiest things to make. You probably have all of the ingredients to make a very simple unscented bath salt right now.
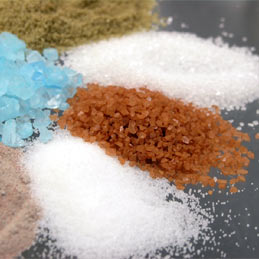
Really all you need to make bath salts is salt of any kind. A good simple recipe is combining 1 cup of Kosher Salt with 3 tablespoons of Baking Soda. For a cheaper Bath Salt that actually soothes the muscles even more, combine 3 cups of Epsom Salts with 2 cup Kosher Salt and 4 tablespoons of Baking Soda. If you would like to add fragrance to the mixture you can just add about 20 or so drops of some essential oil or even your own handmade fragrance oil to the salt mixture. You can experiment with exactly what combination of salts you have on hand or prefer. The basic recipe I have provided is a 3:2 ratio of Epsom salt and salt. Really that is all there is to the basic salt recipe. In more posts I will talk about more advanced techniques including the use of colors and Dendritic salt.

As I indicated in my previous post Meditation Changes the Brain, there is scientific evidence that meditation has beneficial effects not only on your mood and outlook on life but actual physical changes in your brain that increase your capacity to think and reason. Then question then becomes, “How do I meditate?” or even, “What is meditation?” Merriam-Webster defines the act of meditating as engaging in contemplation, reflection or a similar mental exercise. Some of the simplest exercises can be considered meditation. Many people subscribe to the simple 5-10 minute breathing meditation where you simply focus all of your attention on the act of breathing (usually focusing on the breath entering and leaving your nose) and counting those breaths with one count being an inhale and an exhale. Another meditation for those that have trouble sitting still is paying attention to the act of walking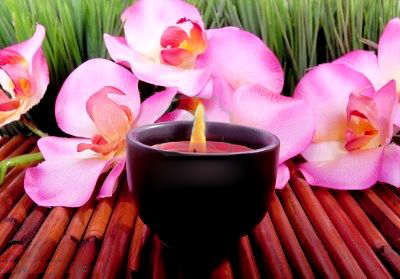 —when your foot hits the ground; what parts hit first, next and last. Another meditation technique that helps those that are easily distracted is lighting a candle and focusing on the flame. A good addition to this exercise is to have a paper and pen ready and just mark down each time your mind wanders. When your mind wanders, simple put the mark on the paper and refocus on the flame. Do this for as long as you can muster. With this technique you can keep track of your focusing progress and how disciplined your mind has become.
These practices can help us understand our own minds. With the fast paced nature of modern western culture, often times we don’t have time to examine who we are as human beings and our relationships with others around us. As you grow in your meditation practices, more advanced techniques can be employed involving mantras and focusing on ideas instead of physical objects. You might even find you can meditate on your morning commute (if you don’t drive and take a train!) filled with the hussle and bussle of people. Outside distractions will no longer bother you. Good luck on your practice!